How to Build a PC
Build a desktop PC in thirteen steps: CPU and RAM on the motherboard first, then into the case, power, GPU, cables, BIOS, and OS. Read one step at a time — finish each before the next. Start with the 30-second preflight. Fans spin but no picture? Jump to No POST. Nothing powers on? See No power.
Tips for reading this guide
- One step at a time. Read the green caption, the Why line, then the bullets.
- Move on when the green done line is true — then go to the next step.
- Take your time. A first build often takes two to four hours.
- Stuck? Ask a friend who has built before — especially for the CPU step.
- On a phone? Tap Jump to section at the top.
- Still stuck? See when to call for help.
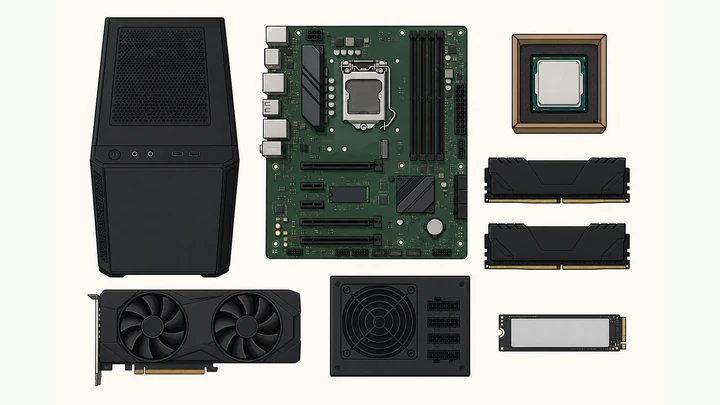
Things You'll Need
- Phillips #2 screwdriver with a long shaft (deep case screws)
- Anti-static wrist strap — or touch bare case metal often
- Large clear table — use the motherboard box as a mat
- USB flash drive (8 GB+) with Windows or Linux installer
- Monitor, keyboard, and mouse for first boot
- Zip ties or Velcro straps for cable management
- Motherboard manual PDF on your phone (front-panel pin diagram)
Where are you in the build?
First-time builders should follow all thirteen steps in order.
AMD or Intel — socket must match
- AMD Ryzen (AM5 / AM4): CPU has pins on the chip; socket has holes. Triangle mark on CPU and socket must align.
- Intel (LGA1700 / LGA1200): Pins are in the socket; CPU has flat contacts. Never touch socket pins.
- RAM type must match the board: DDR5 or DDR4 — they do not mix.
Start hereThirteen steps from parts to installed OS
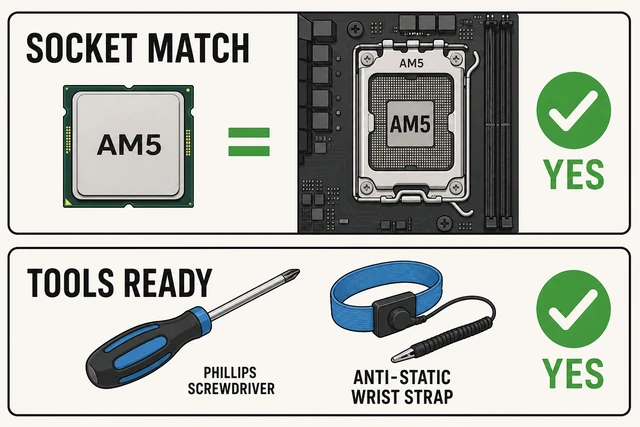
30-second preflight — if any answer is NO, stop before opening the CPU.
Checks 1–2: CPU socket matches chip · screwdriver and strap ready.
Checks 3–4: USB installer made · clear table with motherboard box.
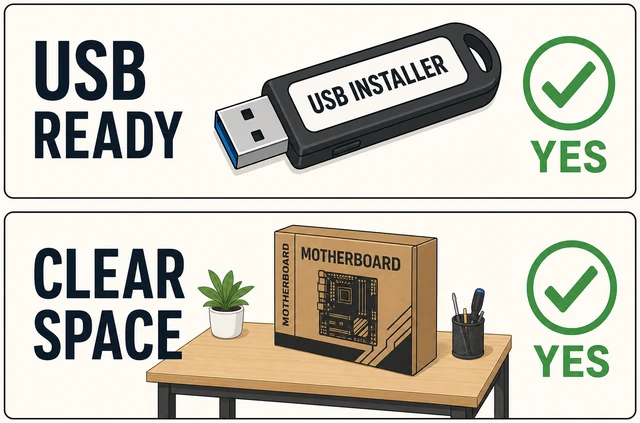
Wrong socket or missing installer means a half-built PC and a trip to the store.
- CPU socket matches chip? AM5, AM4, LGA1700, etc. — check the box labels.
- Phillips driver and wrist strap? Clear table; motherboard box as mat.
- USB installer ready? 8 GB+ drive with Windows or Linux image.
- First build? OK to ask a friend for the CPU step only.
All four checks are YES — you have matching parts, tools, installer, and workspace.
Socket mismatch? Stop — return or exchange before Step 2.
Ground yourself and lay out every part on the motherboard box.
Clip strap to unpainted case metal — parts on the antistatic bag.
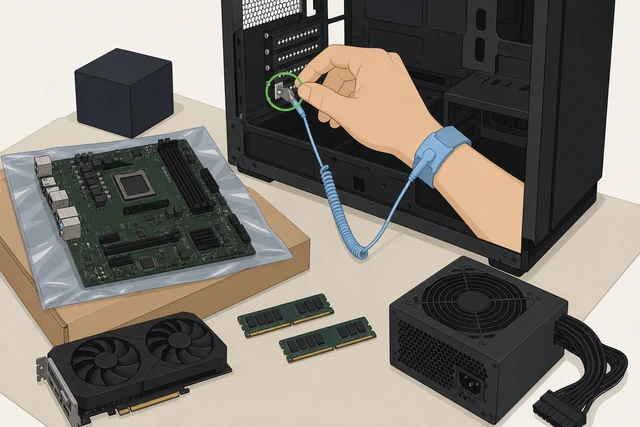
Static discharge can kill CPUs and RAM; the bag and box are designed safe surfaces.
- Clip the wrist strap to bare metal on the case — not painted panels.
- Set the motherboard on its box with the antistatic bag underneath; lay out CPU, RAM, M.2, GPU, and PSU.
- Open the motherboard manual to the front-panel pin page on your phone.
Strap is clipped, all parts are visible on the mat, and you can read the socket label on the board.
Install the CPU in the socket — triangle marks must align.
Triangle on CPU must match triangle on socket — never force.
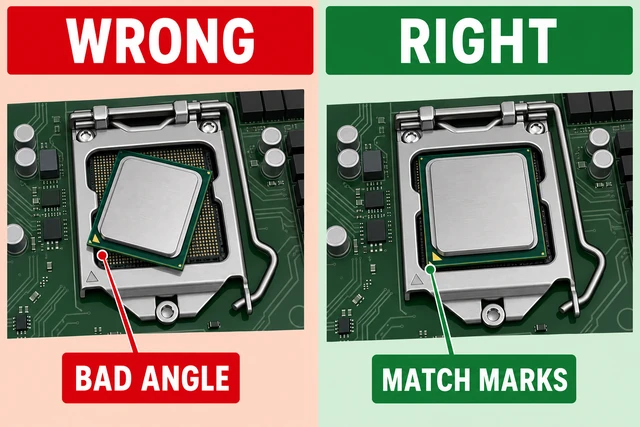
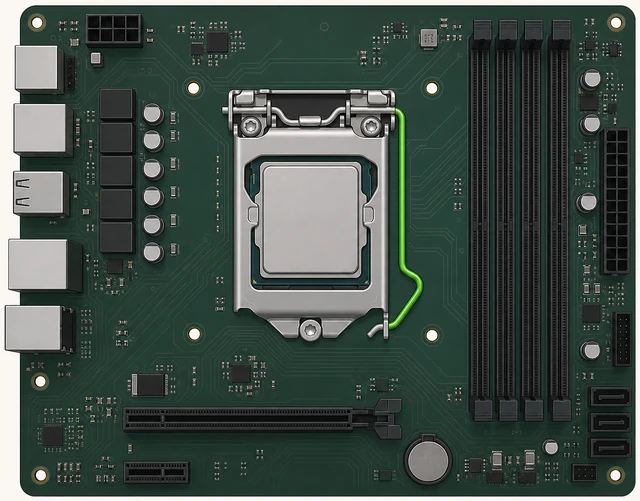
CPU flush in socket — retention arm clicked under hook.
A forced wrong orientation bends pins; alignment is the only safe install.
- Lift the retention arm. Match the CPU triangle to the socket triangle — drop in with zero pressure.
- Close the retention arm until it clicks under the hook.
- Never push down on a misaligned chip — see the compare image.
CPU sits flat, retention arm is locked, and you never pushed down on a misaligned chip.
Install RAM in slots A2 and B2 (2nd and 4th from the CPU).
Open both latches · push straight down until both sides click.
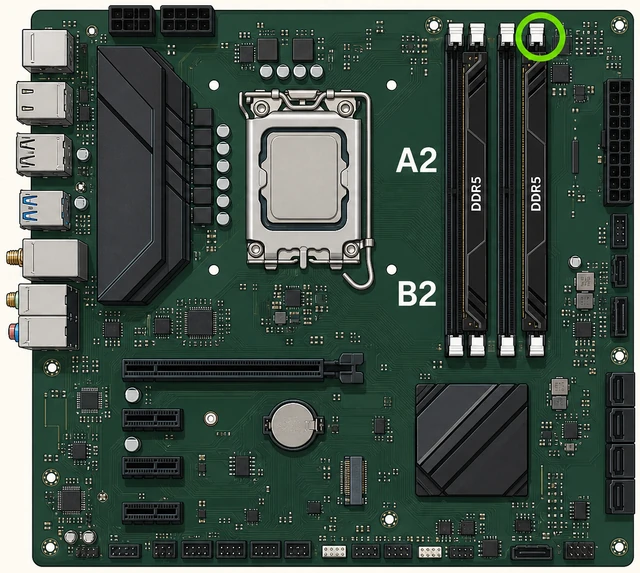
Those slots are the standard first pair for dual-channel kits and fewer boot issues.
- Open latches on slots A2 and B2 (2nd and 4th from the CPU).
- Line up each stick notch with the slot bump; press straight down with both thumbs.
- Both side latches must snap closed on each stick.
Both sticks are fully seated and both end latches are closed on A2 and B2.
Install the M.2 SSD on the motherboard.
30° angle in · press flat · tiny screw — do not overtighten.
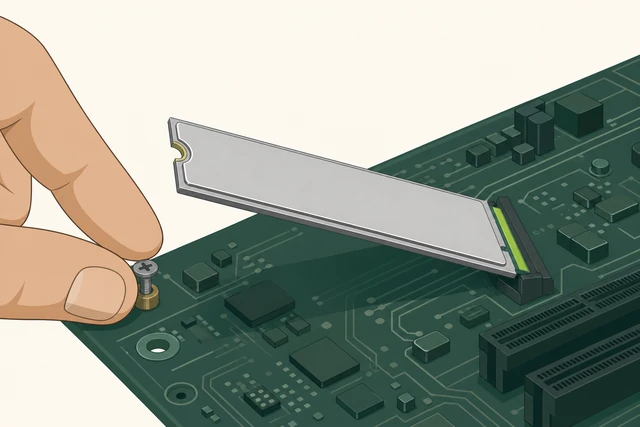
Boot drive on the CPU-linked M.2 slot avoids slow or missing drive in BIOS.
- Remove the M.2 heatsink if present — peel any protective film on the pad.
- Insert the drive at 30°, press flat, secure with the standoff screw — finger-start only.
- Use the CPU-linked M.2 slot for your boot drive per the manual.
Drive lies flat, screw is snug, and heatsink is reattached if you removed one.
Snap in the I/O shield and screw in motherboard standoffs.
Shield from inside the case · standoffs only where holes line up.
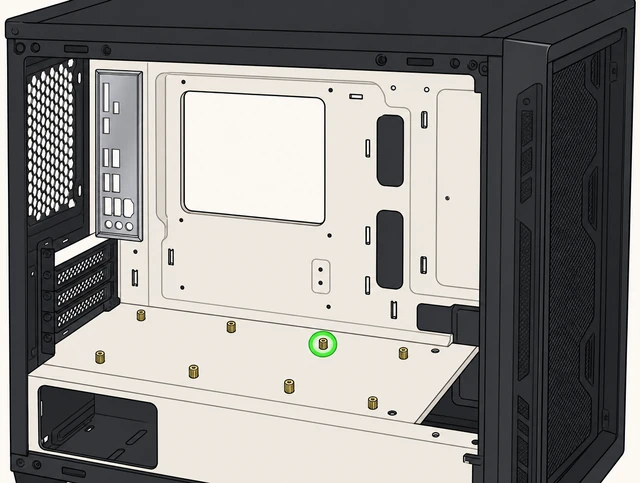
Extra standoffs under the board short traces; the shield must go before the board.
- Snap the I/O shield into the rear opening from inside — prongs face inward.
- Screw standoffs only where holes match your board size (ATX/mATX).
- Remove any extra standoff that does not align with a mounting hole.
I/O shield is flush, standoffs match every board hole, and no extra standoffs remain.
Lower the motherboard into the case and screw it down.
Align rear ports with shield · start all screws before tightening.
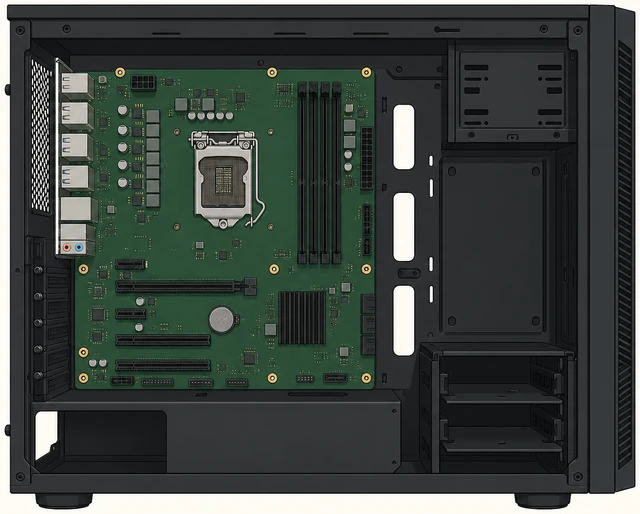
A loose corner lets the board flex and can crack traces when you plug cables.
- Tilt the board in at an angle — rear ports through the I/O shield first.
- Line up each mounting hole over a standoff.
- Start every screw by hand — tighten in a star pattern once all are in.
All mounting screws are in, the board does not rock when you press a corner, and ports line up with the shield.
Mount the PSU and route cables behind the tray.
Fan toward vent or bottom filter · label ends toward the board.
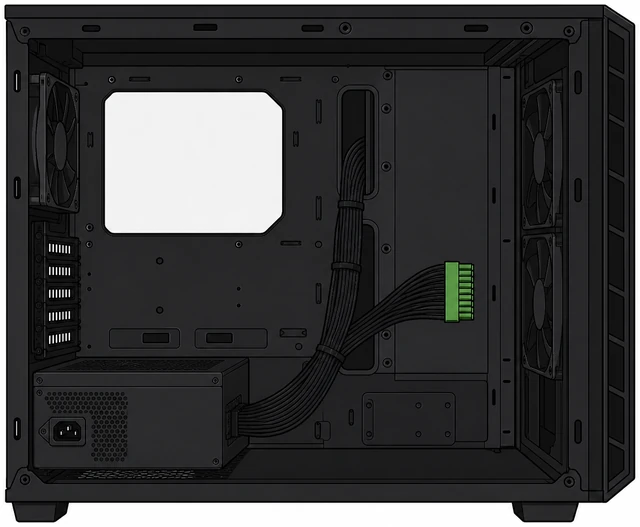
PSU at the bottom keeps weight low; pre-routing avoids a cable knot later.
- Slide the PSU into the bottom bay — label facing out, fan toward vent or mesh floor.
- Screw the PSU to the case from the outside.
- Feed 24-pin and CPU cables through the rear cutout behind the tray.
PSU is screwed in, fan faces airflow, and main power cables are routed behind the tray.
Plug 24-pin ATX and CPU power — shapes must match.
CPU 8-pin only fits CPU_PWR — never force a PCIe plug there.
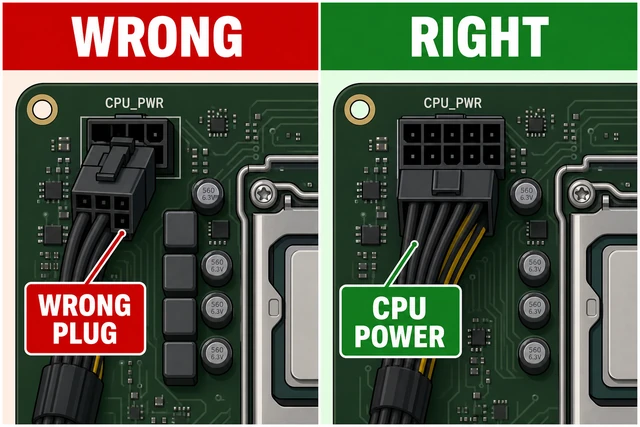
A PCIe plug forced into the CPU header fries the motherboard.
- Plug the wide 24-pin into the edge connector until both latches click.
- Plug the 4+4 or 8-pin CPU cable into the socket labeled CPU_PWR at the top-left.
- Never force a plug — CPU and PCIe shapes differ.
Both 24-pin and CPU power connectors are fully seated and clicked.
Install the graphics card in the top PCIe x16 slot.
Remove slot covers · push until latch clicks · plug PCIe power if needed.
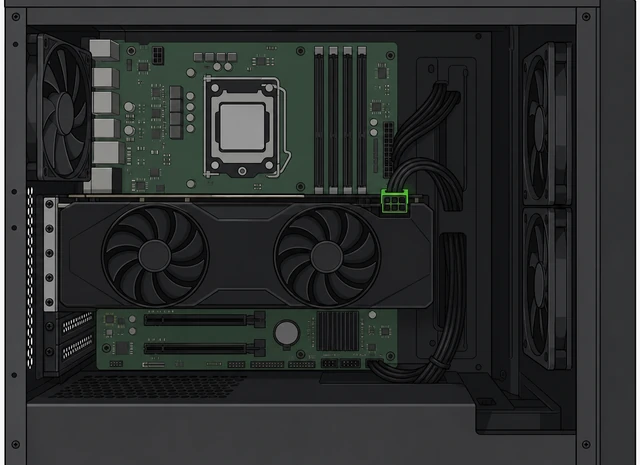
The top full-length slot gives full speed; heavy cards need both power and bracket screws.
- Remove two slot covers; push the GPU into the top x16 slot until the latch clicks.
- Screw the bracket to the case.
- Connect 6-pin, 8-pin, or 12VHPWR power if the card requires it.
GPU latch is closed, bracket is screwed, and all required GPU power plugs are clicked in.
No discrete GPU? Skip if your CPU has integrated graphics (most Intel non-F chips).
Connect the front-panel power switch and case fans.
PWR_SW pins per manual · USB and audio headers are keyed.
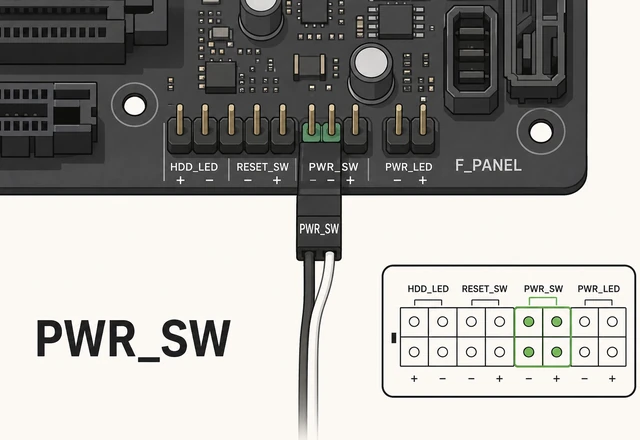
Without the power-switch jumper, the front button does nothing.
- Plug the case two-wire connector onto the PWR_SW pin pair from the manual.
- Plug USB 3 and HD Audio headers — keyed notches prevent backward install.
- Connect case fans to SYS_FAN headers or a hub.
PWR_SW is on the correct pin pair and at least the CPU fan or AIO pump header is connected.
Cable-manage, shake test, and final look-over.
Zip-tie behind tray · shake case — no screw rattle.
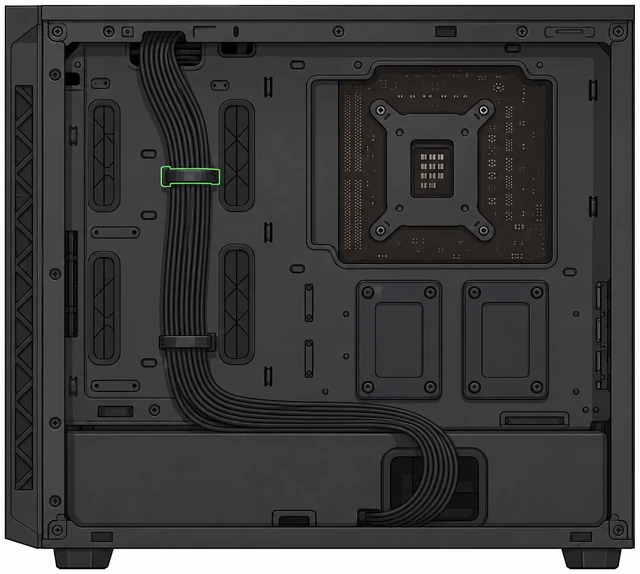
Loose screws and pinched cables are common no-POST causes.
- Bundle cables behind the tray with zip ties.
- Shake the case gently — no loose screw should rattle under the board.
- Re-check GPU, RAM, and every power plug is fully clicked.
No rattling screws, all power and data cables are clicked, and GPU/RAM look fully seated.
First boot — display cable to the GPU, not the motherboard.
With a GPU installed, plug the monitor into the graphics card.
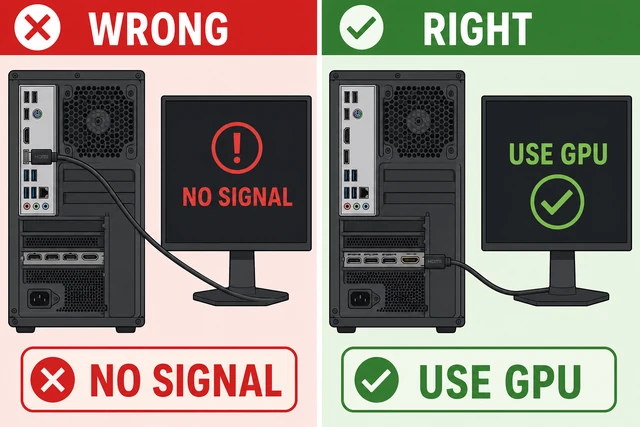
Most Ryzen CPUs have no onboard video — motherboard HDMI stays black.
- Connect keyboard, mouse, and monitor.
- Plug the display into the GPU (not the motherboard) unless you have no discrete card.
- Flip PSU on, press power once, tap DEL or F2 for BIOS.
You see a BIOS screen and your NVMe drive appears under Storage or Boot.
Blank screen? Jump to No POST.
Boot from the USB installer and install the OS.
Select USB in boot menu · install to the NVMe · delete old partitions only on new drives.
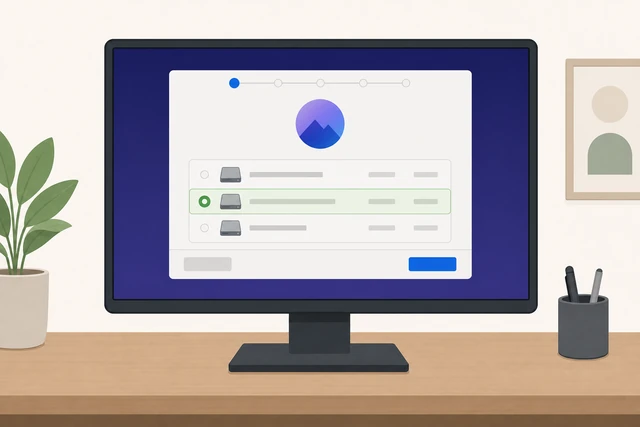
A fresh drive needs partitioning; boot order must list the USB stick first.
- Insert the USB installer; open boot menu (F11/F12) and pick the USB drive.
- Install to the NVMe — delete partitions only on a brand-new drive.
- After install, load chipset and GPU drivers from AMD, Intel, or NVIDIA.
OS installer completes, reboots to setup or desktop, and the PC boots without the USB stick.
Enable XMP or EXPO in BIOS after the OS is stable if you want rated RAM speed.
If there's no display (no POST)Fans spin, lights on, monitor stays black
Use when Step 12 shows no BIOS after power-on.
Reseat RAM and GPU — try one RAM stick in slot A2 only.
Power off · switch PSU off · hold case power 5 seconds.
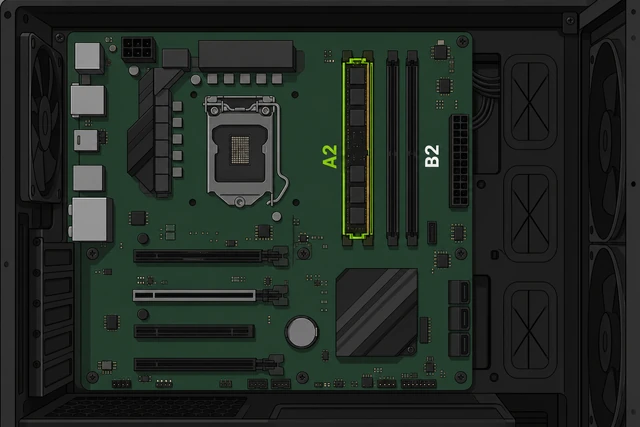
Loose RAM is the most common no-POST cause on new builds.
- PSU off, unplug, hold case power 5 seconds.
- Reseat GPU and power; leave one RAM stick in A2 only.
- Retry boot — note whether fans spin and any debug LED stays lit.
You retried boot after reseat — note whether fans spin and any debug LED stays lit.
Clear CMOS and read the motherboard debug LEDs.
Short CLR_CMOS or remove battery 2 minutes.
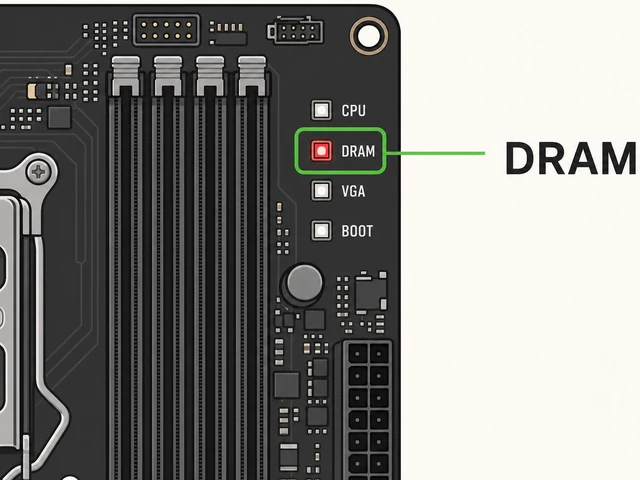
Bad BIOS settings or a stuck POST state clear with CMOS reset.
- Use the CLR_CMOS jumper or button per manual — or remove the coin battery 2 minutes.
- Verify the 8-pin CPU power cable is connected.
- Note which Q-LED stays on: CPU, DRAM, VGA, or BOOT.
CMOS is cleared and you know which debug LED (if any) stays lit during boot.
Breadboard test — motherboard on the box with only CPU, RAM, PSU.
Case off the equation · rule out a short.
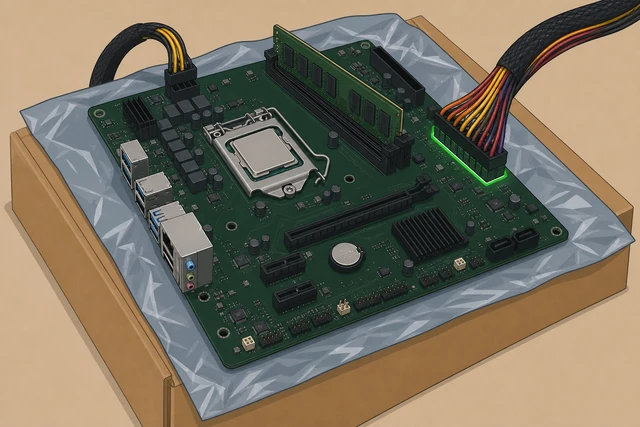
A standoff short or case touch often shows only as no POST.
- Remove the board to the box with the bag underneath.
- Connect only CPU, one RAM stick, PSU 24-pin and CPU power, and CPU fan.
- Short PWR_SW pins to test — if it POSTs on the box, the case had a short.
You know whether the board POSTs outside the case — that tells you case short vs bad part.
If nothing powers onNo fans, no lights when you press power
Use when the case button does nothing — before BIOS is even a question.
Check PSU switch, wall outlet, and 24-pin seated.
PSU switch on (|) · cable clicked at both ends.
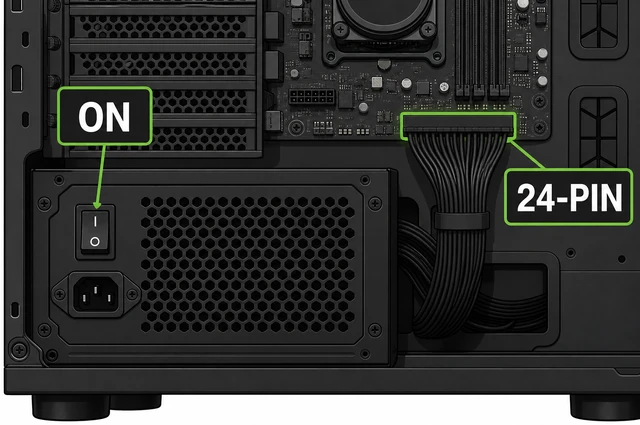
No 24-pin contact means zero power to the board.
- Confirm the PSU rear switch is on (| not O).
- Reseat the 24-pin ATX cable at the motherboard until it clicks.
- Try a different wall outlet or power strip — bypass the strip if unsure.
PSU switch is on, 24-pin is clicked, and the outlet is known good.
Verify front-panel PWR_SW pins — polarity rarely matters.
Two-pin PWR_SW per manual diagram.
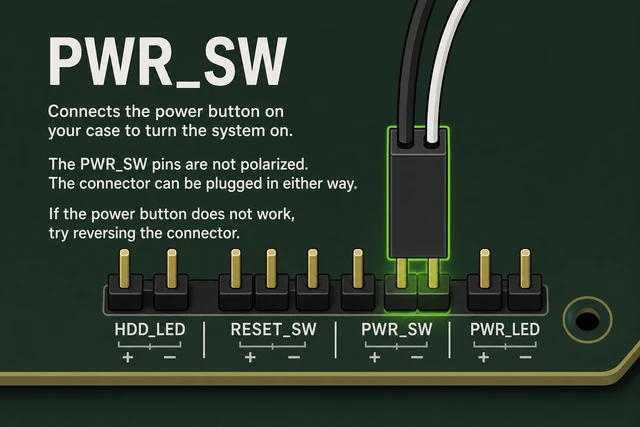
The case button only closes a circuit on those two pins.
- Open the manual front-panel diagram on your phone.
- Find PWR_SW — plug the case two-wire connector on those pins.
- Optional: briefly touch a screwdriver across PWR_SW pins to test without the button.
PWR_SW is on the correct pins and fans spin when you short the pins or press power.
When to ask for help
- Ask someone experienced to watch your first CPU install — bent pins are costly.
- Smell burning or see smoke on first power-on? Switch the PSU off and unplug immediately.
- Stop if a power plug does not fit without force — wrong cables damage the board.
- No POST after RAM/GPU reseat and CMOS clear? A shop diagnostic is cheaper than guessing parts.
When This Doesn't Work
- Bent CPU pins or socket pins: Do not straighten many bent pins yourself — exchange or a repair shop.
- New CPU needs BIOS update: Some boards need a USB BIOS flash before they POST with a new chip.
- Dead on arrival (DOA) part: Test RAM, GPU, or PSU in another system or swap known-good parts.
Warnings
- Switch the PSU off and unplug before touching inside the case.
- Never force a CPU into the wrong socket type or misaligned orientation.
- Do not overtighten M.2 screws — they strip easily.
- A Windows license tied to a prebuilt motherboard usually does not transfer to a new board.
Tips
- Film your cable routing on your phone — easier to retrace mistakes.
- Build CPU, RAM, and M.2 on the motherboard before it goes in the case.
- Keep the motherboard manual PDF open on your phone the whole build.
FAQ
Do I need a GPU for first boot?
Only if your CPU has no integrated graphics. Most AMD Ryzen chips (no G suffix) need a GPU. Most Intel non-F chips have built-in video.
How much thermal paste?
A pea-sized dot in the center — many stock coolers ship with paste pre-applied on the pad.
Windows installer does not see my drive?
For NVMe, seat the drive in the CPU-linked M.2 slot. For SATA, set AHCI in BIOS. Very old installers may need IRST drivers.
Comments
Questions, corrections, and what worked for you. Comments are reviewed before they appear.